
Customizing a Lesson
Because teachers sometimes need to add local content or additional exercises, eTAP allows teachers to customize any lesson in our curriculum. You must be signed in as account with teacher privileges to use this feature. In order to customize resources and quizzes, you must first create a custom version of the lesson they are attached to.
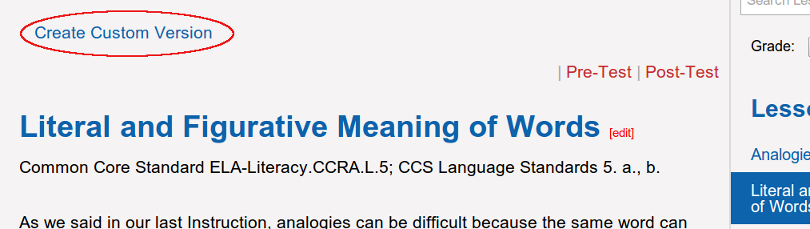
- Navigate to the lesson you want to change. Select "Create Custom Version" at the top of the lesson text.
- Use the text box to make changes.
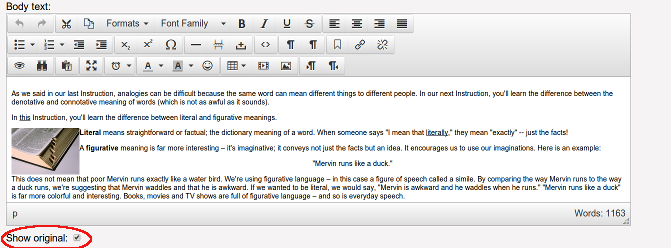
- Below the text area is a check box called "Show Original". Checking this box will allow your students to view both your version and eTAP's original version. Leaving it unchecked "hides" the original from your students, so they will only see your version.
- Save the new version of the lesson. Your custom version will be created, and any quizzes or external links attached to the original lesson will be copied and imported to your version. You may edit or delete these, or add your own.

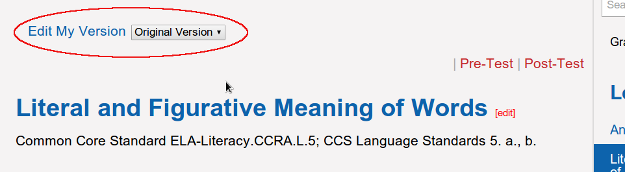
- When you view a lesson you have a customized, the link at the top will read "Edit my version". This link takes you to the same edit page you used to create the version. There will also be a drop-box allowing you to toggle between your version and the original.
Managing Resources In a Custom Lesson
- To delete an existing link from your custom lesson, check the box next to "Delete?" on the row for that link, then press "Save" at the bottom of the screen. This removes the link. (You may select more than one link to delete at a time.)
- To change the url for a link or the title (what is displayed for the student to click on), make the changes in the textbox for that link, then press "Save" at the bottom of the screen. The current resources types are "Video" or "Resources" (everything that's not a video). To change how a link is categorized, change the selection in the dropbox in the row for that link, then select "Save" at the bottom of the screen.
- To add a new link, select "Add new link" below the "Resource Links" header. This will take you to a new page. Enter the title, the resource type, and the URL for the new link. The title is what will be displayed in the lesson, so should be the title of the destination page, or a description of what will be found there. Adding information about the organization hosting the page may also be useful. Resource type will be either "Videos" or "Resources" (anything that isn't a video). The url is what you see displayed at the top of your web browser when you visit the page. (This needs to start with "http://" or the system may get confused.) Once you have entered all the information, press "Add link". You will be returned to your edit screen, and your link will be available.
Managing Custom Quizzes
- To delete a quiz, check the box next to "Delete?" and click "Save" at the bottom of the page.
- To keep a quiz, but prevent students from seeing it, un-check the box next to "Enabled" and click "Save". To re-enable it, check the box and click "Save".
- To edit the quiz title, make the change in the textbox, and click "Save".
- To change the quit type, change the selection in the dropbox, then click "Save".
- To edit a quiz's contents, click "Manage" next to the quiz you want to edit, this will take you to a screen showing the quiz description/instructions, along the list of questions (and their answers). To change the instructions, or to enable/disable a quiz, make the changes and click "Save".
- To change a question go to the quiz management screen, and click "Edit" next to the question you want to change. On the next screen, make your changes, then click "Save".
- To delete a question, go to the quiz management page, and click "Delete" next to the question you want to remove. On the confirmation page, click "Delete" again. This will remove that question and all the answers to that question.
- To edit an answer, go to the quiz management screen, and "Edit" next to the answer you want to work on.. On the next screen, you may edit the answer text, or change whether that answer is the correct one. NOTE: every question must have exactly one correct answer.
- To add a question, click "Add a question" at the bottom of the quiz management screen. Select the question type (Multiple Choice, True or False, or Fill in the Blank), enter the question, and click "Save".
- To add an answer, find the question on the quiz management screen, then select "Add Answer" below the question. Enter the answer in the upper text area. If this is the correct answer, check "Correct". (If other another answer was previously marked correct, it will automatically be un-marked once a new "correct" answer is saved.) Fill in the blank type questions may have only one answer provided, which must always be marked correct. Multiple choice may have any number of answers, but only one may be marked correct. When you are done entering the information, click "Save".
- To remove ananswer, go to the quiz management screen, and click "Delete" next to the item you want to delete, and verify that you want to delete it on the confirmation page. The change is immediate.
