User Guide For eTAP Parents
Because parents of eTAP students frequently take on a teacher's role, this guide includes using some features typically used by teachers. This guide also shows parents with more than one child how to view the records of all their children, and how to provide separate logins for each of their children. Parents who wish to access teacher-specific features should contact us and request a role change.
Getting Started
- If you have not already created an account, register at https://www.etap.org/amember/signup. eTAP has a Free Trial, which gives you full access to the website for 10 days.
- Sign in. All lesson material, tests, records and resources require user authorization. The sign-in page is located at https://www.etap.org/login/, or the link may be found at the top right side of eTAP's main page.
- Parent accounts will be taken straight to the Students management page.
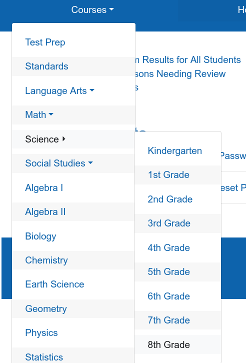
- You can use the menus at the top to choose courses.
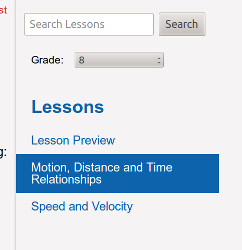
- Select a grade level from the drop-down menu in the right column. For this guide we have selected grade 8.
- Choose which subject you want from the list towards the top of the page. You will see a Table of Contents for your selected subject. For this guide we have selected Science.
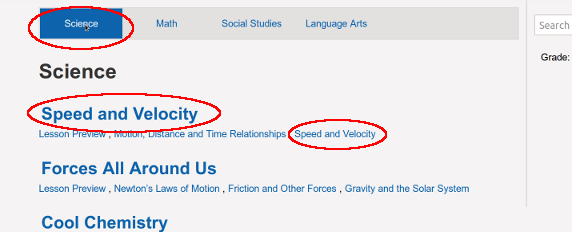
- Decide which lesson you want to view. You may select the unit title, which will take you to the Lesson Preview or first lesson in the unit, or you may directly select a specific lesson in the unit. for this guide we have selected Speed and Velocity.
Navigating eTAP
When are you signed in as a parent, you will see some buttons at the top right of the screen. These buttons will take you to the different areas of the website:
- Scores: This page contains the records of your students' quizzes and assessment tests, with the oldest tests shown first. Any time one of your students takes a Pre, Post, or Practice test you take, or overall Assesment test, their score will show up on this page.
- Students: Here is where you link your account to your students.
- Goals: On this page, you can view any goals you've assigned, and their status. If a goal is not complete, you can add or change due dates here.
Above the blue buttons you will see some information about your account
- Your user name. This is just to show who is currently logged in. You will also see what role your account is assigned, which may determine how some features work. For example, only students can actually take tests.
- Settings. This takes you to a page where you can update your subscription, and manage your password and user information.
- Sign out. This signs you out of eTAP. To record your time of use, you will need to sign out every time you are done using the program.
Managing Your Students
In your Students screen, you will see a list of all your students. The upper area shows who your current students are. To add a student, put the student's email address in the box under "Find students By Email". When you see their name on the list, choose "Add as Student". They will show up on your Student page under "Pending Approval From Student", until they approve you. For each student, you have the following options: 
- Quiz Scores - Displays the list of quizzes for the selected student, including the quiz title, date taken, and result. There is also a link to view the actual quiz, so you may check which questions were missed.

- Login History - Displays the list of login sessions for the selected student, with the date and time the session was started, and the time duration. Note: If you are using the login history to track how much your students spend studying on eTAP, they MUST sign out when they are finished. Otherwise, the time will only reflect the length of the session up to when they last changed pages. For example, if they log in, navigate directly to a lesson, spend an hour reading that lesson, then sign out, the login history will reflect that were logged in for an hour. If they do not sign out, it will reflect only the few seconds it took for them to navigate the site.

This is the default page for parents account on sign in. You will want to use the menus at the top to get to courses or other pages.
Lesson Layout
- Select a grade level from the drop-down menu in the right column. For this guide we have selected grade 8. Alternatively, you can choose a course from the dropdown menu at the top of the screen.
- Choose which subject you want from the list towards the top of the page. You will see a Table of Contents for your selected subject. For this guide we have selected Science.
- Decide which lesson you want to view. You may select the unit title, which will take you to the Lesson Preview or first lesson in the unit, or you may directly select a specific lesson in the unit. for this guide we have selected Speed and Velocity.
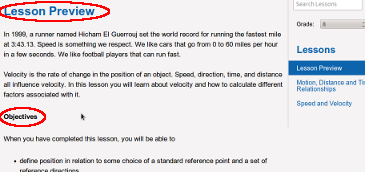
- ou select a unit title, you will first see the Lesson Preview. This will summarizes the lessons, and lists what you will expect your students to know after completing the unit.
- On the right hand side of your screen, you will see a menu listing what sections this unit has. Use this menu to choose a section to study, or to move on to the next section.
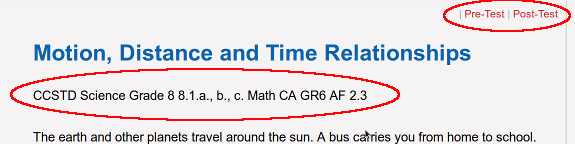
- The top of each section will have a link to Pre and Post tests. Below the lesson title, you will see information about what state standards this lesson meets.
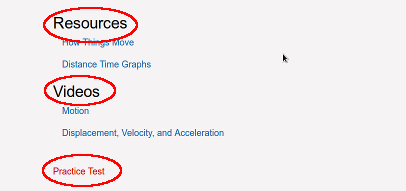
- At the bottom of each lesson page, you will see a list of Resources and a list of Videos. These are links to other websites with information about the topic you are studying. Below these lists, is the Practice Test for this section.
- Some lessons will have other things towards the end of the lesson text, like worksheets, reading lists, or experiments to try out.
How Students Use an eTAP Lesson To Study
- Pick a unit to work on, choose a lesson and take the Pre Test. The Pre Test will help you understand what you need to learn from the lesson. If you get all the answers correct you can advance to the next lesson/topic. In this way you can use the pre Test as a placement test or to do a review for an AP test or another examination.
- Review the lesson. Usually, this means reading the text, but some lessons include worksheets or other exercises. You can also watch the videos and read the other websites listed in the Resources.
- When you think you understand everything in the lesson, take the Practice Test. If you get all the answers right, you're ready for the Post Test. If you miss a question, review the lesson.
- Take the Post Test. If you get a wrong answer, don't worry. Just go back to the lesson and review the parts you had trouble with, and re-take the test when you're ready.
- When you get 100% on the Post Test, you have successfully finished this section! Congratulations!
Adding Lesson Goals
eTAP is designed to let each student set their own pace, so does not have a way to restrict students to a specific lesson or course. However, because some students focus better when told what to work on, or when given deadlines, a parent or teacher can add "goals" for their students.To assign a goal, navigate to the course:
- You will see an alarm clock symbol next to the lessons. Click the symbol to the right of the lesson you wish to assign.
- A box will appear, with a list of your students, and a space for a date. Select the student you want to assign the goal to.
- The due date is option. If you want to assign one, click in the text box, and a calendar will appear. There are arrows at the top to change months if needed. Select the day you want the lesson completed by.
- Select "Add Goal".
- You will see a message that you've assigned the goal. When the student signs in, they will see a message that you have assigned the goal.
- To see all the goals you've assigned, change due dates, and see a list of completed goals, go to your Goals page.
